Navigation: Maintenance > Work Orders > Creating Work Order |
Access
Maintenance / Work Orders
Explanation
An individual work order is just like it sounds, an order for work. Work orders are setup to assign work to a single unit. Here is where you assign personnel to complete the work, assign multiple services to be performed, record parts that are used, and record the results of each service. If your site doesn't have access to Express Maintenance in the field, a printed paper work order can be used to give personnel instructions to complete their assignments, and document their work . When prescheduled services are due (PMs), they are assigned to work orders so personnel can perform them (via Service Overview) . When a breakdown occurs, or a problem with equipment requires someone to investigate, a work order is initiated for that unit. Services, parts, and personnel can be added as the job develops. When the job is done, all actions are recorded in the work order, the services are completed, and the work order itself is marked complete.
Creating Work Orders - 3 Methods
There are 3 ways of creating work orders:
1. |
Create work orders from scheduled services (PMs) using the Services Overview screen. |
2. |
Create work orders from maintenance requests (ExpressRequest) using the Requests screen. |
3. |
Insert manual work orders using the insert button on the Work Order screen. |
1. Creating Work Orders from Service Overview (PMs)
In the Service Overview screen, search for services due. Next, select the desired services for work order creation by clicking in the pick box of each service. Alternatively, you can click the "Select All" button. After the desired items are selected, click the "Create Work Orders" button. Services are placed on separate work orders by Unit and Work Group. If a service is checked for SeparateWO, then the service will also be placed on a separate work order of its own.
The Service Overview has enhanced filtering to show you exactly how many and what services will be selected when creating Work Orders. This feature allows multiple users to select and track the selection process. If you do not see the Picked User Name Column, right click in the grid then Click Reset Grid Layout For example:

When you create Work Orders it will ask if you want to preview what is selected.

If you click yes you will see the below pop up box next.

Select yes to continue to create Work Orders or No to return.
2. Creating Work Orders from Requests
In Requests screen, view the maintenance requests that have been submitted. Select a request by clicking on the record in the grid. Click the "Assign Work Order" button or right click to create a work order for the maintenance request. You can only convert one request at a time to a work order.
Work Order Request has enhanced filtering to show you exactly how many and what requests will be selected when creating Work Orders. This feature allows multiple users to select and track the selection process. If you do not see the Picked User Name Column, right click in the grid then Click Reset Grid Layout For example::

When you create Work Orders it will ask if you want to preview what is selected.

If you click yes you will see the below pop up box next.

Select yes to continue to create Work Orders or No to return.
Finishing The Process
Using either of the two methods described above, the following dialog box will appear:

Simply select the employee / department to perform the work order and the scheduled date for the work order. When you have completed the dialog box, click Ok to have the work order(s) created. The following dialog screen will appear when the work orders are created:
You can print the work order at this time. Alternatively, you can create other work orders and edit or print them later. See the other help topics shown below for details on editing and printing work orders. Work Orders can be manually created (inserted) directly in the Work Order screen. See the topic on Updating Work Orders for more details.
3. Creating Manual Work Orders
There are times when it is necessary to create a work order that is not the result of scheduled services or a maintenance request. To do this, simply click on the Work Order screen and click the Insert button on the data navigator. Proceed by selecting the Unit, Services and other pertinent information for the work order. To print, click on the print button for the work order worksheet.
Items to enter when creating a work order- There are several items of data that should be entered when creating a new work order.
Unit Name: The unit name must be chosen from the available picklist to start the work order (only one unit can be assigned).
Unit Number: This field will be automatically populated when you pick the Unit Name
Site/Location: This field will be automatically populated when you pick the Unit Name
Scheduled: choose the date you wish the work to be scheduled
Work Order Notes: The work order notes field is a rich text field that allows the user to add work directions or a description of a problem that needs investigated. For Example: "operator says there is a leak under the machine" or " machine is making a noise" or "machine is down for rebuild, please complete the services below"
Services: At least one service must be chosen in the lower section of the page to create a work order. If you know which service will be performed, simply add the service and choose from the picklist. Fill in anything else you know such as the technicians name etc. If you don't know what service is required yet chose something generic such as "Investigate"(setup in the admin/services section of the program) to get the work started. The actual services performed can be added later when the work order is completed.
Other Items to consider: Items such as technician, created on date, category, group and class, downtime, count etc can be filled in now or you can wait until the work order is completed.
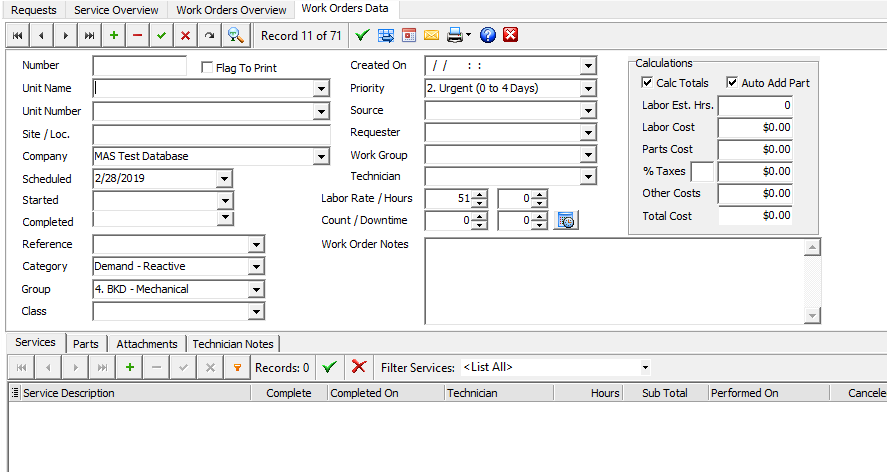
Press the post edit button in the data navigator bar at the top of the screen to save your work.(button icon here) If you need a paper copy of the work order, press the print button(button icon here) and follow the directions that pop up.
Editing Work Orders
When you have completed creating work orders, you can click the Work Orders tab. The work orders just created will be in memory and available for review, further edits and printing. For more information on editing invoices, see the help topic Updating Work Orders.
Work Order Help Topics
ExpressRequest - Managing maintenance request from other users and converting them to work orders.
Service Overview - Managing and reviewing services due (PMs) and converting them into work orders.
Creating Work Orders - Flagging services due and creating work orders.
Work Orders Overview - A quick way to view scheduled and completed work orders.
Editing / Updating Work Orders - Editing or adding information to work orders and completing work orders.
Printing Work Orders - Printing work orders and work order related reports..